Model M starts on the homepage with its music bay open. Compare its music bay with D’s fixed palm-rest deck.
One flowing body.
Screen to keyboard.
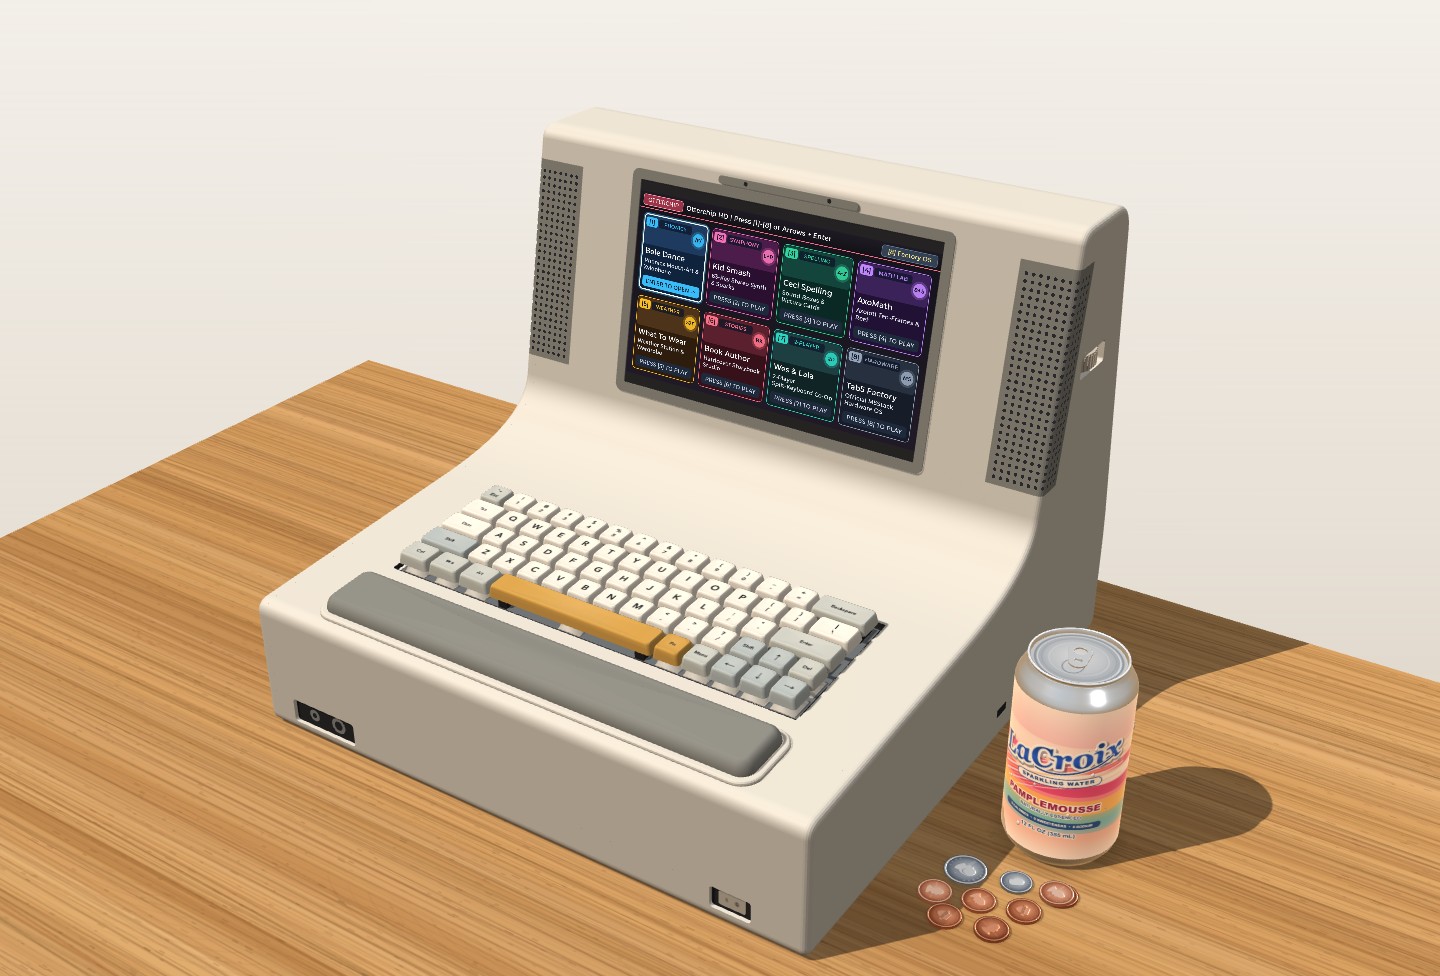
Model D shares Model M’s full-width flowing body, screen, wraparound speaker grilles and audio controls. Its palm cushion sits in a fixed front deck for a straightforward typing computer. Eggshell remains the default; the 28-palette finish collection includes Alaya Black, subdued neutrals and brighter combinations.
Explore Model D in 3D ↗Compare Model MFixed body and palm rest. D has no MIDI bay, wooden music wheels or removable music cover. The sliders choose the shape of a future print; screen and keyboard positions are fixed in the finished body. This is a dimensional concept, not a fabrication-ready or ergonomically validated enclosure.
The original, compact form.
Model W keeps the Tab5 wedge layout and 296 × 198 mm footprint. Its updated mockup has a deeper front edge for recessed headphone sockets and a power switch, plus a right-side volume wheel; archived print files predate these changes. Its screen and keyboard share a sloped deck. It is the compact, carryable member of the family.
A workstation for a child.
D describes the fixed-rest desktop form. Its exterior dimensions match M with the music cover seated: the same screen surround, transition, keyboard deck, rear volume and wraparound grilles. The continuous body carries its full width from screen to keyboard. M adds the covered music bay; D keeps a fixed palm-rest deck.
Fit the child first. Then freeze the shape.
Age six is a starting point, not a body measurement. Start with a chair that supports the back and feet on the floor or a footrest. A stool can work for short sessions, but a correctly sized chair gives more support. Keep shoulders relaxed, elbows close to the body and slightly more open than 90°, and wrists straight. These principles come from Cornell’s child workstation guidance.
Keyboard + table
Deck height and slope are design parameters. Set table height from the key tops: approximately seated elbow height minus the chosen key-top height above the table, then check relaxed shoulders and straight wrists. Start with a low, nearly level keyboard. A low table alone does not establish the fit.
D and M share the typing-keyboard layout. Choose and measure the actual PCB, switches, caps, pitch and mounting plate before manufacturing; the render is not a keyboard purchase specification.
Screen + gaze
Put the top at or below eye level and the center below it. Explore about 50–65 cm eye-to-screen distance with large text, and a 10–15° downward gaze as an initial mockup. The screen’s lean and the gaze angle are separate measurements.
The distance is a prototype starting range within OSHA’s general 50–100 cm guidance, not a validated age-six prescription. Adjust for the actual child and readability.
The parametric study exposes body width; screen height, tilt, setback and display size; keyboard deck height and slope; rear depth; transition softness; outer-edge rounding; and palm-cushion width, depth, rise, corner radius, edge roll, crown height and keyboard gap. These controls change the proposed fixed enclosure. Copy settings shares the dimensions and a reproducible URL so the chosen form can be refined and eventually frozen for printing.
Shared D/M fit study: the conservative donor layout starts at 388 mm wide and raises the typing deck as needed for the full typing support, SE25 underside reservation and headphone assembly. Build & fit also retains the earlier 355 mm compact concept. D shares M’s closed exterior, full-size typing keyboard, grilles and everyday controls, with a fixed palm-rest deck. The screen remains 10.1″ 16:10 at 221 mm, leaning 10.5°, with 159 mm setback. See the current component and support study and recheck table/chair fit whenever the deck height changes.
Measure seated eye height above the table, eye-to-keyboard position, and usable table depth. Screen-center height is the seated eye height above the table minus the desired downward gaze offset. Setback alone cannot guarantee eye-to-screen distance: check the child’s position as well as the enclosure dimensions. Refine height, setback and deck geometry together while keeping the full-width continuous body.
The cushion: a soft rounded rectangle.
The fixed palm rest has long straight sides, rounded corners and a broad top. Its cushion shares M’s 300 mm width × 41 mm depth and 11 mm total rise. The soft insert coordinates with the trim, and its holder is part of D’s fixed deck.
Four shape controls let the cushion keep a rectangular footprint while changing how its edges and top feel. They join width, depth and rise; the selected settings describe a fixed insert.
| Cushion control | Starting value | What it changes |
|---|---|---|
| Corner radius | 9 mm | Rounds the outline when viewed from above. Smaller values make the corners squarer; larger values soften them without stretching the entire insert into an oval. |
| Edge roll | 6 mm | Sets the width of the curved perimeter transition from the holder to the cushion’s top. |
| Top crown | 1.5 mm | Controls the gentle rise toward the center of the top. Set it to zero for a flatter central surface. |
| Keyboard gap | 14.5 mm | Sets the space between the keyboard and cushion. Check reach and palm placement before freezing the print. |
Keep the loaded cushion height around or slightly below the front key tops. The controls describe shape, not material softness: test compression and comfort with a physical sample before choosing the final geometry.
First print
Try TPU with a thin outer skin and sparse internal ribs or infill. Start with printable 95A, and compare softer TPU if the printer supports it. Solid 95A can feel surprisingly hard; geometry is essential to compliance. Prusa describes this thickness effect.
Longer-term cushion
Cast a gray-pigmented silicone insert in a printed mold. Test roughly Shore A 20–30 as a starting point; Dragon Skin 20 is one 20A reference material, not a final material qualification. A smooth surface is easier to wipe than exposed infill.
Retention, without glue
Use a continuous soft flange under the fixed deck’s rigid lip, captured by a serviceable underside retainer. The cushion can flex into place during assembly and stay captive in use; accessing the retainer is a maintenance step. Print fit coupons before choosing groove clearance.
Rest the heel of the palm during pauses; let hands move freely while typing. OSHA recommends a soft rounded support at least 38 mm deep.
The same sound and everyday controls.
D retains M’s stereo speaker and microphone arrangement. The grilles start with a 33 mm front band and a 15 mm side return, following the shell’s corner curvature. Height, vertical offset, corner radius, hole spacing, hole diameter and solid border are adjustable, and parameter edits keep your camera in place. The substantial rear volume reserves the same separate speaker chambers and microphone compartment. Their internal fit, sealing and acoustic performance still need a physical prototype.
Headphones and power at the front.
The front-left 3.5 mm CTIA headset and 6.35 mm stereo headphone sockets are paired with the recessed power control on the right. Their shared starting positions are 47 mm in from the body edges, 17.5 mm above the table, with 2.5 mm recesses and no front service extension.
Volume at the side.
D keeps M’s horizontal volume thumbwheel in the right side, at the 221 mm screen-center height. The control is independent of the wooden keybed wheels found only on M. D’s fixed front deck leaves the music-keybed space unused.
The shared audio study covers the Dayton ND65-4 driver pair, stereo amplifier, natural-recording microphones, headphone circuitry and proposed plug detection. These remain component candidates and packaging reservations. D removes the music keybed and its controls while retaining the display, typing keyboard and audio hardware plan.
Keep mass low. Give the screen a real foundation.
The full-width rear volume is part of the same enclosure as the keyboard deck. Its depth provides room for ribs, fasteners and cable paths while preserving a continuous exterior. Keep this upper volume hollow rather than filling it with weight. A broad footprint, low center of mass and high-friction feet work together; thickness alone does not prevent tipping.
Start with a captive steel plate in the bottom compartment. A 220 × 65 × 4 mm steel plate is about 0.45 kg; rounded edges and a screwed retainer keep it away from electronics. Large steel washers in enclosed pockets are another inexpensive option. Avoid loose shot or small removable weights. Test the device without its optional battery so stability does not depend on a charged or installed pack.
A battery can contribute useful low-mounted mass, but select capacity for runtime. Use a protected pack and matched charger/power path, in a separate compartment with strain relief and no screw or ballast pressure on cells. The Tab5’s standard rear battery position would put its mass behind the elevated screen; moving it into the base requires an engineered electrical connection, not merely moving the rendered box.
Explore static tip resistance
Ideal horizontal force at first static tip: F = m × 9.81 × d / h. Inputs are illustrative, not measurements of this render. Check every tipping edge. Sliding, impacts, grabbing, compliance and uneven surfaces are excluded.
Why ballast is only part of the answer
At 1.3 kg, a 120 mm restoring arm and 280 mm push height give only about 5.5 N before ideal static tipping. A child can exceed that. More weight helps, but a deeper foot, limited leverage and keeping the computer away from the table edge matter too.
Before finalizing, measure the assembled center of mass and test forward, rear and side pushes with a force gauge, plus sliding, cushion retention and cable pulls. No tip-resistance claim can come from the model alone.
Tab5, screenless M5, or Raspberry Pi?
The Tab5 is a sensible prototype, even with touch disabled. It packages a high-resolution panel, processor, wireless, audio, USB host and power hardware. Touch is only one part of the bundle. Its 5″ screen becomes the bigger compromise when you want large child-friendly text at desktop distance. The Tab5 documentation lists the integrated hardware.
USD prices checked November 3, 2026; board/module prices are not complete-system quotes. Shipping, tax, display, keyboard, audio, wireless, storage and battery electronics may add cost. Stock can change.
| Route | Compute / listed price | What it means for Otterchip |
|---|---|---|
| Keep Tab5 | ESP32-P4; 16 MB flash, 32 MB PSRAM. $60 with battery; $55 without. | Least hardware work, existing firmware path. 5″ 1280 × 720 in landscape. Battery version available at check; bare version unavailable. Keep touch unconnected in software if unwanted. Test whether text is large enough. |
| M5Stamp P4 | Same P4 class; 16 MB flash, 32 MB PSRAM. $12.95 module, available at check. | Best custom-carrier candidate. MIPI DSI and high-speed USB; wireless requires an add-on. Needs display/backlight integration, USB host power, audio, storage and battery design. Module savings do not imply a cheaper finished one-off. |
| M5 PoE-P4 + Display Out | 16 MB flash, 32 MB PSRAM. $21.50 + $9.95 = $31.45 before display. | Practical M5 route to HDMI and USB keyboard. PoE-P4 was out of stock at check; adapter available. Output supports 720p60 or 1080p30. Ethernet, no built-in Wi-Fi; add audio and portable power. PoE is optional: USB-C 5 V is supported. |
| Waveshare P4 + matched panel | P4 / C6 developer-board options with 32 MB PSRAM. DEV-KIT family listed from $18.99; bundles vary. | A useful integrated-board alternative. Buy an exact board/panel combination with a working BSP. Check connectors and display support; sharing the P4 does not make Tab5 firmware a drop-in binary. |
| Small M5 S3 boards | AtomS3R: 8 MB flash / 8 MB PSRAM; S3 family up to 240 MHz. | Useful for smaller displays or lighter apps. They are not equivalent to the P4’s memory/display path: no native P4-style MIPI DSI, fewer exposed pins on tiny modules, and USB/panel wiring needs review. An Atom’s footprint is not the main benefit inside this large case. |
| Raspberry Pi Zero 2 W / Pi / Compute Module | Zero 2 W: $15, quad-core 1 GHz, 512 MB RAM. Larger Pis add headroom and cost. | Natural route for HDMI, richer applications and Linux drivers. Zero 2 W uses mini-HDMI and USB OTG; it has no DSI display connector. Budget for storage, power, audio, adapters and display. A Compute Module adds a carrier-board project. |
| Raspberry Pi Pico 2 | From $5; dual-core 150 MHz, 520 KB SRAM, 4 MB flash. | A firmware-oriented MCU, but not a Tab5-equivalent display computer. Good for modest graphics and direct hardware control; poor fit for preserving this 720p interface without substantial redesign. |
Bigger does not automatically mean sharper.
A 7″ 1024 × 600 panel is physically bigger but has fewer pixels than the Tab5. A 7″ 1280 × 720 panel preserves the existing layout while making everything 40% larger. An 8″ 1280 × 800 panel adds vertical room; the emulator letterboxes the current 16:9 image rather than stretching it. The 7″ and 8″ model choices are size studies, not selected parts.
A bare LCD can fit behind a narrow lip with rear clamps and a compliant gasket. Avoid compressing the active panel or glass edge. Panel outline, active area, flex exit and controller board determine the actual bezel. MIPI DSI is not a universal plug-and-play connector: confirm pinout, voltage, lane count, timings and initialization driver. HDMI with a controller is usually easier to interchange, at the expense of thickness, cables and power.
What changes when resolution rises?
One RGB565 framebuffer needs about 1.76 MiB at 1280 × 720, 1.95 MiB at 1280 × 800, or 3.96 MiB at 1920 × 1080. Double buffering doubles those amounts; assets, audio and the program need space too. 1080p also moves 2.25 times as many pixels as 720p. An output timing specification is not a promise that the apps will redraw at that rate. Prefer larger readable UI before chasing resolution.
“Embedded” does not have to mean “no operating system.”
ESP-IDF normally runs FreeRTOS: the firmware experience you like can already include an operating system, just without a desktop, package manager or general-purpose user environment. That focused appliance behavior is the important quality.
Pi with a minimal Linux appliance
Boot directly into one native application, omit a desktop, use a read-only root filesystem, and explicitly manage writable saves and shutdown. You retain Linux’s drivers and libraries while presenting a single-purpose computer. Raspberry Pi’s kiosk guide describes autostart and overlay filesystem techniques; a browser kiosk is optional, not required.
Pi without Linux
Possible: Circle supplies a C++ bare-metal environment with USB and other hardware support. CPU and RAM remain useful. The cost is a narrower driver ecosystem and more responsibility for graphics, networking, storage and lifecycle behavior. Check support for the exact Pi model and peripherals; do not assume Linux GPU, camera or multimedia features carry over.
Using a Pi as an appliance does not throw away its CPU or memory. Running it bare-metal may leave some accelerators or peripherals unused because the necessary driver is missing. For this project, I would move to Pi when the application needs Linux-class capabilities—not merely to eliminate a touchscreen.
Firmware reference: Espressif’s ESP-IDF FreeRTOS documentation.
The direction I would take.
- Use W and the existing Tab5 as the working baseline. Keep the software running while validating the physical arrangement with cardboard or a simple fixed mockup.
- Choose Model D’s geometry interactively, then measure it with the child. Explore the full-width form with the dimensional controls. Check reach, screen distance, keyboard height and the available table depth together. Send the copied settings back; the final print will freeze them.
- Evaluate a P4 board plus a supported panel at the chosen size. For HDMI, PoE-P4 + Display Out is the most direct M5 route found, subject to stock and exact monitor compatibility. For a thin custom panel, compare a matched Waveshare kit with a Stamp P4 carrier.
- Use captive steel ballast first, battery mass second. Choose TPU geometry by touch samples; cast silicone if the print cannot deliver the right feel.
- Only then produce manufacturing CAD. Freeze panel and keyboard part numbers, measure all mounting points, design wall thickness, screw bosses, cable paths and the retainer, and validate stability. Existing downloadable STLs are Model W only.
Design updated November 5, 2026; component-price research remains dated November 3. All dimensional and material targets are starting points for prototyping. No hardware purchase or firmware migration has been made.